Showing posts with label Home Improvement. Show all posts

Wednesday, September 16, 2015

The Kitchen Dresser Make Over

So, I've had this dresser for MANY years. I think I paid $20.00 for it at a local thrift store (back before thrift stores started charging retail prices for their furniture).

I liked it okay and it served it's purpose. It holds dish cloths table cloths, potatoes and onions. As well as cook books and a whole drawer of extra spices. I like my extra drawers! 

She was ready for a makeover though. She just didn't feel a part of the new kitchen remodel but look at her now!!!! 
I was trying to decide between these two knobs. 
I ended up going with the carved ones on top. Super fun.

I used the same technique with the dresser top as I have with my kitchen table and the back stairs (which I never blogged about, must remedy that).
I sanded off the whole top of the dresser before I stenciled and applied the stain.
I only primered and painted the rest of the dresser/ no sanding.

The finished product. I know that this isn't a perfect piece, no heirloom, not something that will even stand the test of time but I do enjoy giving a face lift to a nice piece of furniture.
Stay crafty my friends.


Sunday, October 26, 2014

Faux Metal Kitchen Backsplash, Paintable Wallpaper

One of the final projects that we had to tackle was the back splash behind the stove. Here's a little reference of where we began. We first tiled behind the stove back in 2005. I needed to do something because this country pink and blue flowered wall paper was very hard to clean.

Here we were a few short months ago. Cupboards were painted and the tile was quite a dark spot in the kitchen. Enter demo-man (aka my adoring husband).

Just one, teeny, tiny problem. Removing the tile was tearing off the drywall. We ended up having to remove all of the drywall behind the stove and over to the refrigerator.

Unfortunately, I'm not sure I have a picture of just the plain wall, but here it it when we put the first pieces of  wallpaper up. Please don't judge me for still not having painted or textured the wall behind the stove. It's a great reminder of where we've come from ;)

I wanted to use what we had on hand instead of buying those faux tin tiles they carry at home builder supply stores. So, I used the same textured, paintable wallpaper that I used for my cabinet make over that you can see here. I used Krylon's Brushed Nickle Satin Spraypaint to paint the paper panels before hanging them on the wall. It's the same paint I've used on my hardware and pulls and MANY other things around my home ;). It did not take long to dry at all.

At first the seams were quite pronounced (well, they were to me, but not to Travis)

 As the day went on and the glue dried they were hardly noticeable. We also painted the cover plates and receptacles with the same spray. It may or may not hold up over time??? We aren't plugging and unplugging a lot on this wall so hopefully it will last. The metal plates are pricey.

I love how clean and streamlined it looks now. The best thing is is that if I ever want a change we won't be putting holes in the wall!!

Hope your weekend was fabulous. Stay crafty and enjoy the little things. I'm just about done with the house. I have a few more pieces of furniture to paint...including the piano (YIKES!)


Tuesday, September 16, 2014

Wood Stove Slate Tile Surround

After we ripped the carpet out of our second living area and put in the wood floors I knew that I would want a bit more tile on the floor surrounding the stoves so as not to singe the floor with embers from the fire. Please ignore the fact that my wood stove needs to a good deep clean. It gets A LOT of  use during the winter months here (awwwe look how shiny it used to be) and we've been uber busy with the remodel since February.
I purchased the slate tile from Lowe's back in 2002 or so. I'm so glad they still carry it so that I could continue with this project. In 2002, Travis hand milled the redwood mantle piece and built the raised platform with a pallet. We had a solid starting point, over the years the edge tiles in the picture above began to chip and fracture off...which is the nature of slate.  Major dilemma.

My solution was to cut the edges of the surround tiles at a 45 degree angle so that it couldn't shear off. We added tiles to the face of the platform as well as another whole run along the floor. I think that it looks much nicer now. Also, it's great to have an electrical genius as a husband. I get outlets wherever I want them :)

I found that the transition piece that looked the best between the tile and the flooring was a laminate marbled brown. It was not inexpensive, costing much more than a piece of transition wood does, but I'm glad for the splurge as hopefully it's low profile and durability will be a bonus as we trudge in wood and lug out ash in the winter.
Hope you're having a grand week. Stay crafty, or thrifty, or just plain busy.

Tuesday, September 02, 2014

Book Shelf Makeover: Divine Heirloom White

Well, here I am again. A little more progress each time I come back here and visit with you all. I purchased this bookshelf on Craigslist for $60.00 a while back. It is solid wood with solid wood shelves. One problem, it was dark and dreary and didn't match any of my other furniture.
This shelf usually holds all of my scrapbooks and doesn't look like such a major catastrophe. This is how it has been for the last few months though...while the remodel has been in progress. Heaven help us, there may be an end in sight.

I started priming it before I took the "BEFORE" picture. That's me, all gung ho and stuff. I remembered though and here it is. I don't have a garage so all of my painting either happens on my front porch or in my house...somewhere, usually the dining room. Makes for fun dinnertime conversations and maneuverings.

I really like Zinsser's NVOC Bullseye 123 primer. It seems to give the best coverage. I put on about 2-3 coats. Those crenelations on the top of the shelf were really no fun to paint...just saying. 


I did remove the doors and the hardware and painted it with my Krylon Satin Nickle spray paint. I also added 2-3 coats of Heirloom White satin finish paint. To finish off any painted piece I always use Wipe On Polycrylic. It's easy to apply, doesn't smell very much and dries pretty quickly. Much easier than varnish and doesn't cause a yellowing over time.

Here is the bookshelf in it's finished state. My albums are happy to be home (I purged about 10 games in the process) and the shelf is back in it's rightful place in the living room/office/scrapbook area. It makes me feel so much lighter. I keep all of the children's extra school supplies (paper, pencils, folders, workbooks) in the cupboard portion of the shelf.
I hope that the projects that you're working on are coming along just as nicely.
Thanks for stopping by and hopefully, some day, I'll get to start crafting again ;).

Monday, July 28, 2014

Remodel Update: Removing Windows

Where have I been the whole month of July you may ask. Right here and in Utah, but mostly here. Living in a house that is almost unlivable at times ;).
We finished the floors and then we decided it would be a great idea to rip out some windows...who doesn't love remodeling for months on end? Hahaha.


You find lots of  "interesting" things when you rip houses apart. Why in heaven's name would you put so many shims in between the window casing and the wall??? Holy mackerel. 
My men tearing down the siding outside. It's raining today or I'd have gotten a picture of what that looks like. You almost can't tell there ever was a window there. Awesome. We will, however, need to paint the house when we're all done with the interior.

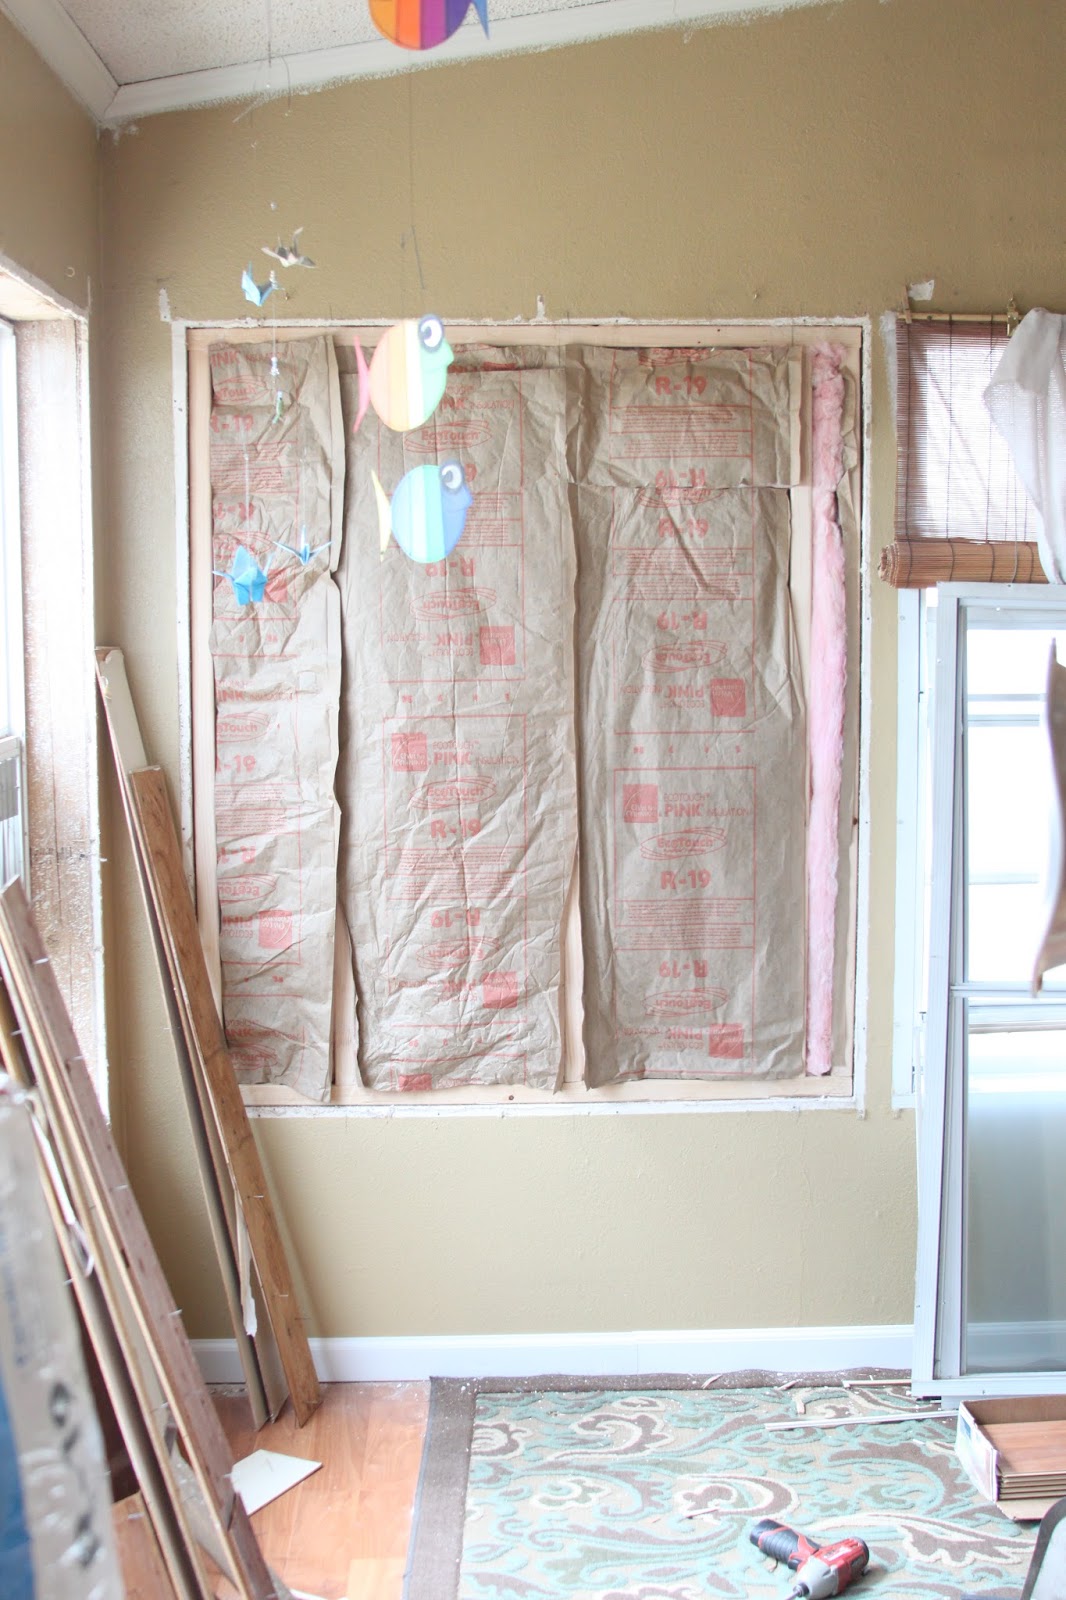
 Window framed to wall.
Now filled in with insulation. Ready for the drywall. That won't happen until the other two windows are removed. So there's a little update and hopefully we'll get this room back in working order soon. It IS my craft area and I'm going through withdrawals. Have a happy week.

Tuesday, June 03, 2014

My Unplanned Bathroom Renovation: Grown Up Bathroom

That "If You Give a Mouse a Cookie" thing is still happening over here. With everything all topsy turvy I decided the kid's bathroom needed to be made over too. I had purchased a shower curtain on clearance for $7 I think but then the blue in their bathroom just didn't look right anymore. SURPRISE, SURPRISE ;).
Here's how there bathroom looked for A LONG time until I painted the mirror frame white and painted the cupboards white, pulled out the linoleum,tiled, textured over the wall paper, painted, and added bead board to the walls. Phew. It's come a long way.
So has my little guy.

 So, here's a picture with the new curtain, the walls still blue and the crown molding still unpainted. (Yeah, I left it unpainted all of these years even though everything else was white in there...I'm a slacker. There are no wall studs in a large span of the wall so every hook or towel bar we had would eventually rip out of the walls...four kids will do that to dry wall...even with wall anchors.

Moving on up. The trim is painted I just have to fussy paint along the wall where it meets the trim.

I am loving the new color...it's been bright blue for sooooo long. 

Our solution to the weak wall problem was to add a piece of trim along the entire wall so that we could screw it in where the studs were. Travis did such a great job milling this piece with a nice edge. I looked at Lowe's for decorative towel hooks. THEY HAVE GOT TO BE KIDDING. The cheapest one I could find there was $12.97. And it wasn't anything special. 
Next stop: HOBBY LOBBY
I found these great hooks for $3.99 a piece but they were on sale for 50% off. YAY.
Four hooks for less than the price of one at Lowe's. 
They were a dark metal finish, so I did have to spray paint them with my trusty standby
SATIN NICKLE by Krylon. Perfection. 
I measured out evenly spaced intervals and mounted them with screws. Hopefully, they last longer than the old hooks.

This owl was on clearance at Walgreens for $2. Had to have!

The mirror was on markdown at Burlington for just $9. It is a really nice piece. 

Hard to photograph the lighting but what used to be up here was U-G-L-Y! 

Found this serving plate stand at the Salvation Army for $2. Perfect to hold all of the stuff the kids like to leave out on the counter. (He went from "shaving in the first picture to Clearasil ;)) 

It's silver plated and very sturdy. 

Well, I hope you've enjoyed this little look into my GROWN UP bathroom. My boys hate it and say that they liked the blue better. Oh well, can't make everyone happy ;).
Have a great week!!!

**ONE QUESTION: DO YOU LIKE THE GRAY SPACE IN BETWEEN THE TOWEL HOOK BAR AND THE BEAD BOARD OR DO YOU THINK I SHOULD PAINT IT ALL WHITE IN BETWEEN?


Wednesday, April 23, 2014

Laundry Room (Area) Makeover Update

I will be sharing more pictures when things come together even more but I'm happy to say that at least ONE are of my home is complete (almost ;)).
Just a few tiny things need to get taken care of.
One of the things that I'm glad I did was buy new light bulbs. I purchased the GE Reveal bulbs and I think
that they really do make a difference in how things look.
I love our new vinyl flooring by the back door. We were going to put wood back there but realized that we get a ton of wet/muddy foot traffic back that way so we went with the floating vinyl tiles.

My washer and dryer are not a matching set...no biggie...they get the job done but you could see the hoses behind my washer so I used some leftover fabric from when I made over the stereo cabinet and made a little curtain. I honestly made it in less than fifteen minutes. It's not perfect but it gets the job done.
Oh, and the food storage containers will be going back into the kitchen when I'm finished painting in there so it will be nice and open in the laundry area (not really a room :).

I was thinking of making a cute sign to hang in there over the cabinets.
So, what do you think?
Hope you're having a great week.

Monday, April 07, 2014

More home remodel "PROGRESS" tearing out wall tile.

Seriously, it's like one step forward, two steps back over here.
 It all started on Saturday when I decided that the cobalt blue tile had to go. 
It was bringing my kitchen down man ;).
I have loved that tile for since we installed it years ago, but it is too dark for the new kitchen.
So, what happens when you try pulling tile off of your drywall...THIS!
It literally ripped pieces of the wall off and we had to cut out the entire section of wall to the studs.
So now I have to buy some 3/8" drywall and put it up before my vision can be realized. Sheesh.
The only good thing is that I won't really have to tape and texture because my vision involes
WALLPAPER!!!
Interestingly enough that's what this wall started out having. You can see that I never changed it out behind the stove. It's REALLY lovely (gag) country pink and blue...everybody's favorite.

Hope your weekend is shaping up to be amazing.
General Conference for my church was so uplifting. Getting to listen to that while working on my house AND having my husband home for the weekend was pretty awesome.
Stay crafty my friends and pray for me...
living in this chaos is getting old.

Sunday, March 16, 2014

Home Remodel PROGRESS??? If You Give a Mouse a Cookie Analogy

I feel like the story of this remodel is like the book "If You Give A Mouse A Cookie".
If you give Misty new flooring then she's going to want new cupboards to go with it ;).

As you can tell, I've been MIA from paper crafting for a while. That's because I just HAD TO go and start on a LITTLE remodel project for our home. We REALLY needed new flooring as our carpet was 20+ years old. Also, the tile we had put in about six or seven years ago was cracking and coming up in places (guess you get what you pay for). So, that led to me pulling up A LOT of tile...and led to us pulling out the carpet. 
We purchased some really nice laminate flooring at Costco and we were going to do the whole house with it, minus the bedrooms.
But then we kept thinking we might not want laminate in the laundry area/mud room because it gets wet and used a lot in the winter. That led to me buying this vinyl floating floor stuff that looks like slate.

But then that led to my house looking like this!

And this. Heaven help me. I knew once we put the laminate in that I would think there was altogether TOO MUCH WOOD in my kitchen...so I'm in the middle of painting all of my cupboards Heirloom White by Rustoleum. Love that color. You can see it here on my Stereo Cabinet makeover.

But then that led to fixing a bunch of the drywall in the laundry area so that I can paint it :)

So, the floor is finished back here, not that you can tell. We'll be texturing and painting this week.
 
something along the lines of this color.
Have a super week...I have to go weave around some paint cans to get to my bed now. ;)

Monday, February 10, 2014

Home Improvement Tile Removal

We interrupt our regularly scheduled crafting in order to bring you new wood floors!!!! :) 

I will be returning shortly to help out with Sweet Stamp Shop's February release, but for now, I'll be covered in tile dust and trying not to vibrate out of my shoes ;)